chocking charlie


conscious patient

1. leaning him forward
2. palm of the hand make 5 back flows
3. make 5 abdominal thrust
4. repeat until foreign body out

unconscious patient

1. baringkan patient
2. 5 back flow, patient is standing on his side
3. 5 abdominal thrust on his abdomen


sila klik

Subcutaneous and Intramuscular Injection

click here for viewing video. ;)


upper outer quadrant of gluteal region(intramuscular)


side injection:

intramuscular - 1. upper outer quadrant of gluteal region(to avoid injury of sciatic nerve)
                        2. anterior  lateral of thigh(away from femoral nerve)
                        3. deltoid

subcutaneous - 1. deltoid
                        2. abdominal at belly
                        3. anterior lateral of thigh


Radial Pulse

1. ask patient to pronate and slightly fix teh forearm.
2. place the lips of the index, middle, and ring fingers just proximal to patients wrist on the thumb side
3. push slightly at first, gradually adding pressure till feel the pulse.
4. check for regularity, if regular count the rate pulse for 15 seconds and multiply by 4.
if irregular count for 3 minute and divide by 3.

5. record the results as beats/minute.

Blood Pressure

1. position patients right arm so that it is horizontal at the level of midsternum.
2. locate brachial artery at about 2cm above the cubital fossa
3. select an appropriate sized cuff.
4. inflate the cuff 20-3-mmHg more than estimated systolic blood pressure. you can estimate systolic blood pressure by palpating the brachial or radial artery pulse and inflating the cuff until you can no longer feel it.
5. place the stethoscope over the brachial artery pulse.
6. reduce pressure in cuff at rate 2-3 mmHg
7. first consistent korotkov sounds indicate systolic pressure.
8. muffling and disappearance of the korotkov sound indicate diastolic blood pressure.
9. record blood pressure as the systolic reading over teh diastolic reading.
10. if blood pressure over than 140/90 indicate night take a second reading after giving patient rest one minute.
11. if patient has a history of postural hypotension, also record the standing blood pressure.

click skill lab

Basic Life Support

Inspecting Victim

1. Personal safety : using gloves
2. Check victim or response : shaking both shoulder, ask if his okay or not, shouting out his name.
3. If the victim respond, leave in a position and try assess what is wrong with him
4. if the victim does not respond, turn the victim on the back and shout for help.
5. clear the airway for any obstruction. Maintain patient airway.
6. use either jaw thrust maneuver, head tilt chin lift of insertion of oropharyngeal airway.
7. access breathing : look, listen and feel
8. check for breathing and assess carotid pulse.
9. if no pulse or sign of life : start CPR immediately.

method 1 : Head Tilt Chin Lift
1. place your hand on his forehead, gently tilt his head back.
2. with your fingertips on other hand, under the point of patient chin, lift chin to open airway.
3. hold the airway open, put your ear to his mouth. Listen, feel, and look for breathing for no more than 10 seconds.


click head tilt chin lift
method 2 : Jaw Thrust
1. apply both your hand of 4 fingers to the angle of his mandible on both sides.
2. apply both thumbs on the chin keeping the mouth open. Then listen, feel and look for the breathing movements and sound of patient.

click jaw thrust

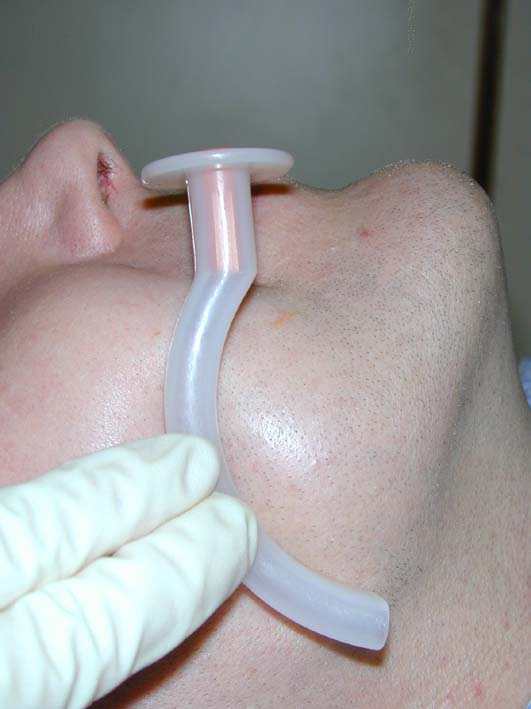
Method 3 : Oropharyngeal airway insertion.
1. identify need for guedel airway( if the airway is obstructed or patient is unconscious).
2. size the guedal airway measuring distance from the incisors to the angle of jaw. (2 for small adult, 3 for medium adult, 4 for large adult)
3. insert guedel airway so that its concave side faces away from the tongue.
4. insert airway into tongue to one third of its length. gently pushing airway further in it and rotate 180 degree.
5. choose appropiate sized bag-valve mask.


method 4 : mouth to mouth breathing
1. check victims mouth and remove any obstruction
2. pinch soft part of victims nose using the index finger and thumb on the hand is placed on his forehead maintaining head tilt.
3. allow his mouth to open and maintain chin lift.
4. take a normal breath and place your lips around his mouth making sure a good seal.
5. blow steadily into his mouth while watching for his chest to rise.
6. maintain head  tilt chin lift. take away your mouth away and watch for hi eldest chest to fall.
7. deliver second rescue breath and return to chest compression.
8. continue chest compression and rescue breath at ratio 30:2
9. stop checking victim only if he starts breathing normally.
10 continue resuscitation until qualified help arrives or until patient normally breath  or until exhausted.

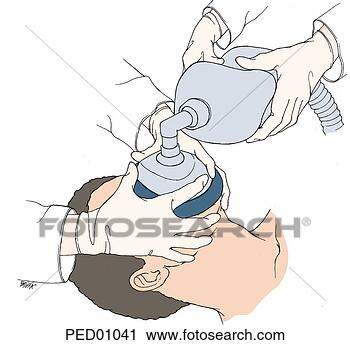
method 5 : bag valve ventilation
1. choose appropriate size bag valve
2. attach bag valve to oxygen supply.
3. hold the mask over his face. thumb on his nose, support the jaw with middle and ring fingers, ensure tight seal.
4. compress the bag
5. look for rise in chest
6. ventilate at rate of 10 compression on bag per minute.


method 6 : cardiac compression
1. interlocked hand in the middle lower half of the sternum.
2. position shoulder vertically above victim chest and straight arm depress the chest by 4-5cm aiming 100 compression per minute.
3. after each compression, release the pressure on chest without losing contact between your hands and sternum.
4. give 30 chest compression followed by 2 ventilations.
5. only stop compression for debrillation or pulse check.

click cardiac compression

method 7 : recovery position
1. kneel beside the victim and makesure both legs are straight
2. place arm nearest to you out at right angle to his body, elbow bent with hand palm uppermost,
3. bring far arm across the chest and hold the back of the hand against the victim's check nearest to you.
4. with the other hand, grasp the far leg just above the knee and pull it up keeping the foot on the ground.
5. keeping his hand pressing against his cheek, pull on the far leg to roll the victims toward  you.
6. adjust upper leg so that both hip and knee are bent at right angle.
7. tilt the head back, ensure pathway remain open
8. call 999

click recovery position

Assessment of the Nutritional Status


Direct Method of Nutritional Assessment
-deal with the individual and measure objective criteria

1. Anthropometric methods
2. Clinical methods
3. Dietary valuation method
4. Biochemical laboratory method

Indirect Method of Nutritional Assessment

1. Ecological varies including crop production
2. Economic factor ex : per capita income, population density, social habit
3. Vital health statistics particularly infant & under 5 mortality & fertility index

Anthropometric Methods
  • Mid arm circumerence
  • skin fold thickness
  • head circumference
  • head/chest ratio
  • hip/waist ratio
Measurement for adults

height measurement
stand on stadiometer with movable head piece. Recorded to nearest 0.5cm.

weight measurement
use calibrated electronic or balance beam scale. Read to nearest 100gm

Nutritional Indices in Adult
  • is body mass index(BMI) = weihgt(kg)/ Height(m2)
  • high BMI (obesity level) associated with type 2 diabetes & high risk cardivascular morbidity and mortality 
BMI
Weight status
Below 18.5
Underweight
18.5 – 24.9
Normal
25.0 – 29.9
Overweight
30.0 and above
obese

Waist Circumference
  • measure at the level umbilicus to nearest 0.5cm taht should be taken under normal expiration.
  • level 2 denotes obesit

MALES
FEMALES
LEVEL 1
<94cm
<80cm
LEVEL 2
>102cm
>88cm


Hip Circumference
  • measure around hip and buttocks to nearest 0.5cm without indenting soft skin.
  • high risk to indicates upper body obesity are
interpretation waist/hip ratio
male = >0.95
female = >0.80

Dietary Assessment

1. 24 hours Dietary Recall
2. Food Frequency Questionnaire
3. Dietary History
4. Food Dietary
5. Observed food comsumption


Nutritional Requirement for Vulnerable Group

Feeding of Pregnant and lactating Women

  • most vulnerable
  • basal metabolic rate (BMR) increase by 20%
  • need extra kcal to build :-  
            1. their own tissue
            2. fat stores for making breast milk
            3. the baby and placenta
  • lactating mother needs more proteins, vitamins, minerals and kcal than pregnancy
Health consequences of maternal malnutrition
A) Fetal and child effects
- low birth weight
- congenital malformation
- rickets
- anaemia
- decrease resistant to infection

B) Maternal effects
- maternal depletion syndrome :-
     -iron deficiency anaemia (IDA)
     -protein energy malnutrition (PEM)
     -iodine deficiency orders (IDD)
     -osteomalacia
- maternal infection(puerperal sepsis)
- maternal mortality

maternal height and pre-pregnant weight contribute to factors affecting size of placenta

Feeding of Infants and Growing Children

  • for infant give exclusive breastfeeding during first 6 months of life
  • for pre-school children, they are high prevalence of malnutrition due to :-

   hyperactivity and lack of interest in food
   faulty feeding habits
   high prevalence of infectious and parasitic disease

  • severe prolonged malnutrition in first 2 years lead to retarded brain growth and development.
Industrial Workers
Factors to be taken :-

1. type of work whether light, moderate or heavy
2. climatic condition - in cold environment more kcal is needed.
3. working condition(mountains, indoor, outdoor)
4. exposure to toxic materials and fumes :-
     exposure to hydrocarbons and aromatic compound need more proteins and carbohyrate for liver support
     exposure to benzene need more protein and vit C to decrease toxicity
     exposure to lead need balance diet like iron to decrease lead toxicity
5. social and educational status
6. adolescents, working pregnant and lactating women